Introduction to Photoshop
Make your coursework pixel-perfect with our tutorials which introduce the main aspects of the software to help you build your media products.
Why You Should Use Photoshop
When you are creating a media text for your coursework, you need to encode your message with an effective combination of elements to ensure it has the right impact on your target audience. Put simply, your texts have to look good.
Adobe Photoshop has a great set of tools for changing the brightness and contrast of your photographs, developing colourful and eye-catching headlines, fine-tuning a website logo, and designing the marketing materials for a print campaign.
You can build appropriate media products by using the filters on your phone or image-editing apps online, but Photoshop has a more comprehensive range of features that will help you meet the demands of the coursework brief and achieve the top grade.
Do not be daunted when you open the software for the first time. The interface is scary. The number of tools and panels can be disorientating. But our guides and tutorials will help you achieve pixel-perfect results in your coursework.
If you are already familiar with the workspace and want to practise some of the basic skills, go ahead and jump straight into our first Photoshop exercise which focuses on using the type tool to create text layers. Our second series of tasks will develop your ability to use the rectangle tool and both the properties and layers panels.
Open Photoshop, click the “create new” button, select a default document, and let’s get started.
Contents
The Photoshop Interface
No matter which version of Photoshop you are using, the program’s interface is complicated and unwelcoming, but our quick tour will help you find your way around the different areas.
Menu Bar
First, running along the top of the screen is your typical menu bar. You can access most of the commands, functions and windows from this menu. Again, do not worry about all the options that suddenly appear in the submenus because you will become more familiar with these features as you work your way through our guides and exercises.

If you already have the program open, left click on the menu and hover over some of the items. The vast amount of commands should give you a sense of Photoshop’s incredible potential.
Options Bar
Directly underneath the main menu, you will notice the options bar. When you select a tool, this bar will display the various editing tools available for that particular feature. For instance, the following image shows you the options bar for the type tool.

In this example, the typeface is Times New Roman with a regular weight and size 12 font. The text is left-aligned and black in colour. Select a different tool and the options bar will quickly change. If you cannot see the options bar, click “Window” in the menu bar and select “Options” at the bottom of the submenu.
When you are designing your media text or tweaking a template, most of the modifications can be accessed from the options bar.
Toolbar
The third feature is the tools panel which is usually docked on the left of the interface. This long bar contains all the tools you need to edit your images, such as the selection tools and type tool. The move tool is located at the very top of the bar.
You can drag the toolbar to a more convenient place on your screen by clicking and holding the bar at the top of the toolbox.
A few of the tools will be immediately obvious. Pressing the uppercase T icon selects the writing tool and the magnifying class is for zooming in to take a closer look at your image. If you hover a button, you will see a definition of the tool or a video of the function in action.
Be careful because some variations of the tools are hidden. For instance, the circle, rectangle and line tools are all located in the same position on the panel. You might have to right click the button to reveal the list of related tools and the feature you want to use.

Panels
Next, in the default workspace, which is known as Essentials, there are lots of panels on the right of your screen. Arranged into tab groups, each panel contains different controls for working with your images. When you see the interface for the first time, do not be overwhelmed. Layers, history and character are really the only three panels you need for your media studies coursework. In fact, you could clear your workspace by closing some of the groups right away. Just leave the layers and history tabs on your screen.
To close a tab group, look for the “hamburger” menu symbol on the top-right corner of the panel. Left click to reveal the menu. Select “close tab group”.
You can undock a panel by left clicking and holding the top of the tab or title bar. If you are missing a panel, or accidently close a group, just left click “Window” in the menu bar to reveal the full list.

Document Window
Finally, the document window should be in the middle of your screen. It displays the image you are currently working on. If you have other open files, their tabs will appear along the top of this area just like most browsers.
The grey area surrounding the canvas helps define the edges of your document and is not part of your final image.
Layers Panel
Many students initially struggle with the concept of layers in Photoshop because they don’t realise that the document’s images, text and objects are actually stacked one on top of the other. Even with the auto-select function disabled, someone in the classroom will inevitably keep clicking a section of their image and wonder why they are unable to modify it.
The layers panel displays how the different items are organised and makes them easily accessible to the user. To select a layer, click once to the right of its name. You can then make changes to that layer once it is highlighted. If you want to hide a layer, click the eye icon to left of the layer. You can toggle the visibility on and off by clicking the box, which is a good way to work out the content of that particular layer.
There is no doubt the layers function is one of the most important aspects of Photoshop because it allows you to move and edit the content in one item without affecting the content on the other layers.
In this example, the background is simply a white canvas, but notice how it is locked. There a some text layers above some sort of background image which is called Layer 1. You can tell the “headline” layer is selected because of the way it is highlighted in the panel.
Just remember, the top layer is at the top of the list.
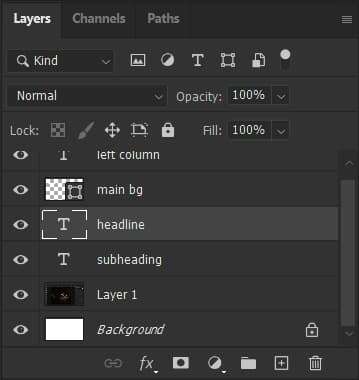
Top tip: double clicking on the layer name will give you the option to rename the layer. If you media text becomes increasingly complex, having a suitable name for a layer will make it easier for you identify.
The History Panel
You are probably familiar with the “undo” functionality that comes with a lot of programs, including the short cut Control+z in Windows. This allows you to take a step back in your work if you have made a mistake. Photoshop has a dedicated panel that tracks all your recent changes and edits which allows you to skip back lots of steps by simply clicking one of the states on the list.
You will make mistakes. Learning how to undo them is easy with the history panel.
Opening a New Document
Now you are a little more aware of the key aspects of Photoshop’s interface, we should have a quick look at how to open and save a document. When you left click “File” on the menu bar and then select “New”, a dialog box will appear where you can choose from a wide range of presets or recently opened files.
There are several ways you can import an image into Photoshop. Although it might take a couple of attempts, it is relatively easy on a desktop computer to drag and drop a jpg into the work area. Or you can copy and paste an image onto a layer. It is important to remember the coursework brief probably demands you use original images.
Saving a Document
Photoshop files are saved with the .PSD extension. This format will retain all the layer information and settings so you can come back and edit the file until it is ready to submit to your teacher. Just select File > Save from the menu bar. The shortcut is, of course, Control+s (Windows) or Command+s (MacOS).
However, this format is not suitable for uploading to a website or copying into a print publication. To export the image as a .jpg or .png. Select File > Save a Copy. In the dialog box, you can choose the file type from the relevant drop-down menu.
Conclusion
It will take you some time to become familiar with the complicated interface, but you will need to learn how to navigate around the workspace and use the panels and options bar if you want to design terrific media products for your coursework.
Adobe offers an amazing series of tutorials to help you use their software and refine your skills. We would also recommend Envatotuts+ and their Photoshop tutorials and courses. Of course, you can also learn the basics with our own tasks and guides. Have a look at our quick guide to navigating around Photoshop. Or start with our lesson on the type tool and then try out your skills with the rectangle tool in our second lesson.
Good luck!