
Create an Album Cover
Develop your Photoshop skills with our guide to making an album cover.
Introduction
Many critics believed it was final for vinyl, but the industry has seen a resurgence in recent years. Over 47 million records were sold in America in 2025. Although global superstars, such as Taylor Swift, account for a majority of these sales, independent artists are also seeing tremendous interest in their physical media.
Some fans believe the little imperfections make the sound more authentic compared to the cleaner digital experience. Records are also beautifully packaged with artwork just as important as the music.
Taking inspiration from the classic Illmatic (1994) by Nas, we are going to superimpose an aerial shot of council houses over a portrait of our fictional rapper, Zemiotic.
Creating an album cover is a good way to practise combining image and text layers in Photoshop. Of course, you can follow this tutorial with your own ideas.

Contents
File Settings
Open Photoshop and click the New File button. You can also open the New Document window by going to File > New on the top menu or using the keyboard shortcut Ctrl+N. Don’t be confused by the different options. Everyone has their own way of doing things. Some people like the shortcuts. Others prefer clicking mouse buttons. You should use the option that suits your workflow.
Now we need to create a custom file.
Type a name into the preset details.
In the dimension options, type 3000 x 3000 pixels for the highest quality. You want your album cover to look sharp so use 300 ppi because it is the industry standard for print products.
We are leaving the color mode RGB during the editing process to limit the file size. School computers are not always able to handle larger documents so you could use 1600 pixels for the height and width instead.
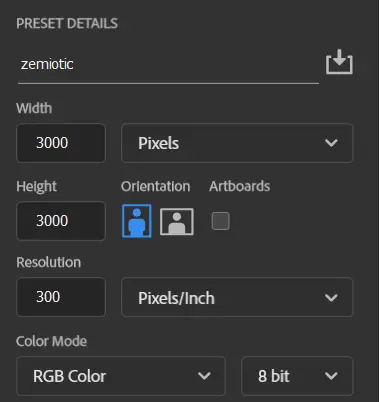
Once you have entered the correct details, select the Create button. The new blank canvas will automatically open.
If you are unfamiliar with the workspace, read our introduction to Photoshop.
Add Image Layers
Drag and drop is often the fastest way to insert an image into Photoshop.
Find the file’s location on your computer.
Click and hold the file. Then drag the file down to the Photoshop icon. This will open the software so you can drop the file directly onto your canvas.
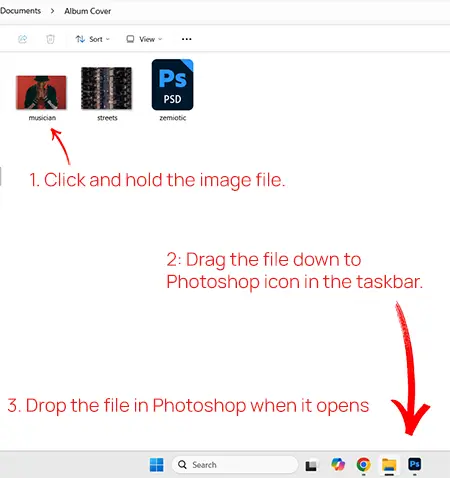
You should be prompted to confirm the placement. Press Enter on your keyboard or the tick icon at the top of the screen.
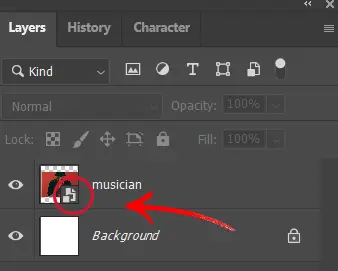
The imported image will appear in the Layers panel as a new layer.
Take a closer look at the thumbnail. There should be a small icon on the bottom right corner to signify the layer is a smart object. This means you can resize the image, rotate it, and adjust the position without losing the quality of the original pixel data.
Another way to insert an image is going to File > Place Embedded on the main menu. Find the location of the image, select the file and then click Place. This method should also keep the layer as a smart object but check the thumbnail to be sure.
Position the Layer
Use the shortcut Ctrl+T to access the transform tool.
You should see a box around the layer and diagonal lines crossing the image. Hover your mouse over the transform handles. The cursor will change to a two-sided arrow to let you know you can scale or rotate the image.
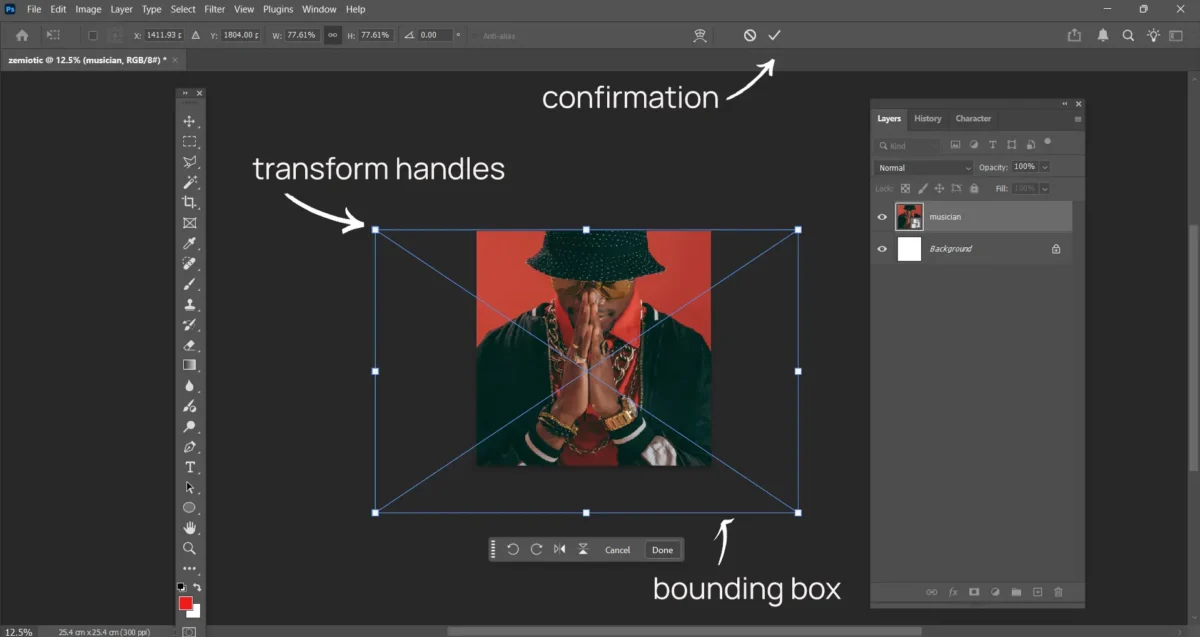
Left click and hold on the border. Drag the handle to resize the image.
Importantly, if you are struggling with the size of the canvas on your screen, press Ctrl+- to zoom out or Ctrl+= to zoom in.
To move the layer into position, press Ctrl+V to select the move tool.
Confirm the placement by pressing Enter.
Changing the Opacity
Drag and drop your second image into your Photoshop document.
You can change the opacity value at the top of the Layer panel. Type your new percentage in the box or drag the slider. 100% means the layer is fully visible. 0% is fully transparent.
We went for 25% in this example for a soft effect.
Blending Modes
Take this opportunity to mess around with blending modes.
You can access the blending modes in the Layer panel. Look for the dropdown menu with the Normal default already selected. It should be at the top of the panel.
This Photoshop process controls how the pixels of one layer interact with the pixels of the layer underneath. The darken modes compare pixels to keep the shadows and darker textures. The lighten modes preserve the lighter areas of the images. The different combinations of colour, light and contrast can produce some interesting visual effects.
Work your way through the options to see how they blend the two layers.
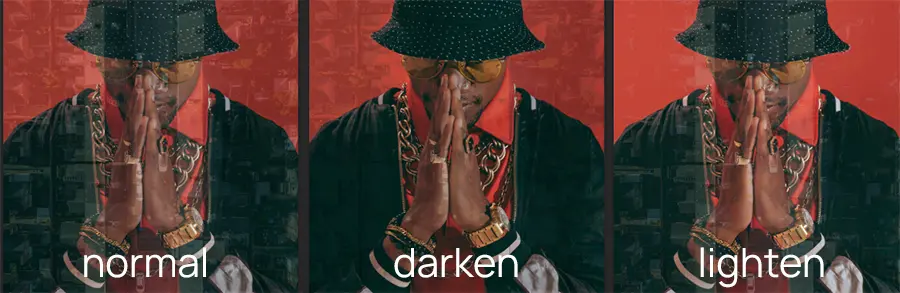
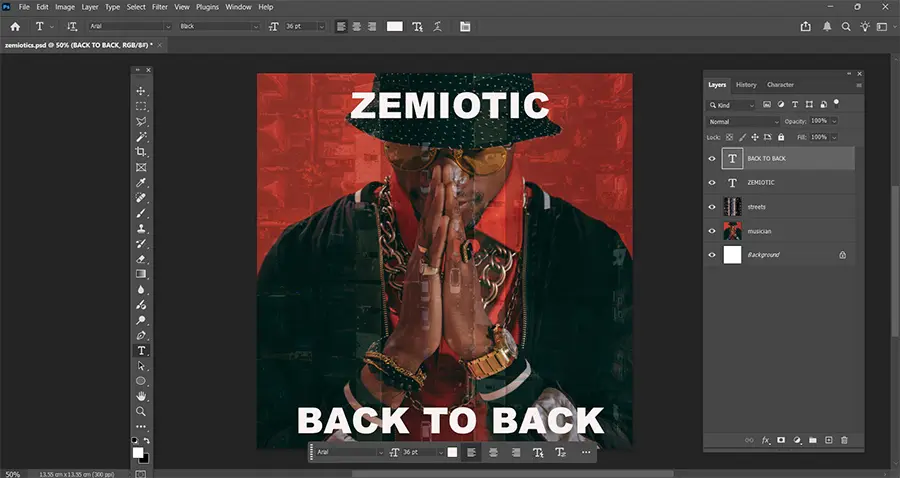
Keeping the 25% opacity from the previous step, we used the Hard Light blending mode to increase the contrast and make the artwork more dramatic.
Adding Text Layers
It’s time to add the musician’s name and the title of the album.
Simply press T on your keyboard to select the Horizontal Type tool. You can also click the ![]() icon from the tool bar.
icon from the tool bar.
We used the name Zemiotic for the rapper because this is media studies website and we study signs. The album title refers to back-to-back terrace houses found in many inner cities and council estates in the UK.
Final Thoughts
The portrait for our album cover was taken by LightFieldStudios. It demonstrates the importance of taking your time to get the right image for your work.
Blending the artist with an aerial shot of the streets connotes his deep connection with the city. This interpretation is anchored by the title which suggests his home will always be a part of his identity.
We hope you enjoyed combining image and text layers in Photoshop and have produced a really good album cover of your own. If you would like to reinforce your skills, try our guide to creating a movie poster next.